Quick answer: to build a retaining wall, call 811, dig a trench 12 in wider than the block, compact at least 6 in of gravel base, bury at least 6 in of the first course, lay a perforated drain pipe low behind it, add courses with 12 in of clean stone behind each, then fix the caps.
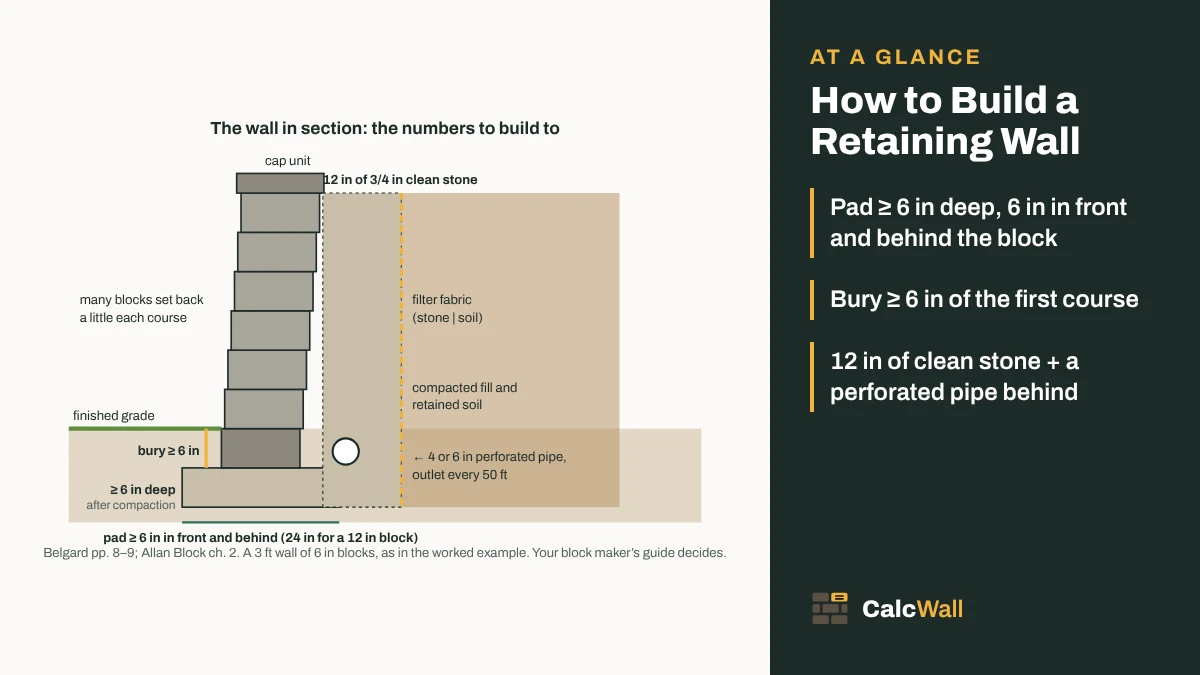
The 8 steps in order:
- Check the height, permits and drainage, and call 811 before you dig.
- Mark the line and dig a trench 12 in wider than the block.
- Lay a gravel leveling pad at least 6 in deep after compaction.
- Set the first course level, with at least 6 in of it buried.
- Lay a 4 or 6 in perforated drain pipe low behind the wall.
- Add courses, filling 12 in of clean stone behind each one and compacting the soil behind that.
- Add geogrid only to an engineer’s design, on taller walls.
- Fix the caps and finish the grade so water runs away from the wall.
What is a retaining wall?
A retaining wall holds soil back where the ground changes level. It turns a slope into a flat terrace, a level lawn or a raised bed. The soil behind it pushes all the time, and it pushes harder when it is wet, so a retaining wall is really a drainage project with blocks on the front.
There are four common kinds. Segmental block walls are dry-stacked concrete units with a lip or pins that lock each course to the one below; they are what this guide covers, because they are the usual DIY choice.
Timber walls use treated sleepers or ties and are quick but shorter-lived. Natural stone walls are laid dry or in mortar. Poured concrete and mortared block walls sit on a concrete footing with steel to a design, and are a job for a pro. Low block walls are gravity walls: they stay up by their own weight, the buried course and the drainage behind them. Taller ones need geogrid layers tied into the soil, and an engineer.
Before you dig: how tall, permits, 811, drainage and soil
- Height. Belgard says gravity walls have height limits specific to each product, and to check your local building code for retaining wall height limits. Find your block’s chart before you buy. If your wall is near the limit, see step 6 first.
- Permits. Many towns need a permit above a certain height, or for any wall near a property line or a slope. Ask your building department; this guide makes no code claim.
- Call 811. Dial 811 to reach your one-call center, wherever you are digging. PHMSA says the states require the call 48 to 72 hours before you dig, the call is free, and the utilities come out and mark their lines with flags or paint.
- Water. Look at where rain goes now. Downspouts, a slope that drains toward the wall or a wet spot behind it all need a plan for the water, and a place for the drain pipe to come out at daylight.
- Soil and loads. Soft or wet clay, a slope above the wall, a driveway or a building near the top all make the job harder. They are the cases where block makers lower their height limits and ask for a design.
Tools and materials: how much to buy
Work out the quantities for your own wall in the retaining wall calculator. For the 30 ft × 3 ft wall in the worked example below, it gives:
| Material | 30 × 3 ft wall (calculator) | What it is |
|---|---|---|
| Wall blocks, 6 × 16 in face, 12 in deep | 170 (161 + 5% waste) | 23 a course × 7 courses, 1 buried |
| Cap units, 16 in | 25 (23 + waste) | One row along the top |
| Base: crusher run / road base | 1.11 cu yd = 1.65 tons | 24 × 6 in pad, 30 ft long |
| Drainage: clean crushed stone (#57) | 3.89 cu yd = 5.25 tons | 12 in behind the wall, full built height |
| Perforated drain pipe | 40 ft | 30 ft along the wall + one 10 ft outlet |
| Filter fabric | 135 sq ft (before laps) | Back and top of the drainage stone |
From the calculator’s US defaults (base stone 110 lb/cu ft, drainage stone 100 lb/cu ft). Open these numbers in the calculator to change the size or the block.
| Tool | Used for |
|---|---|
| Stakes, string line, line level, marking paint | The wall line and the height of the first course |
| Spade, flat shovel, wheelbarrow (or a hired mini digger) | Digging the trench and moving stone |
| Plate compactor or hand tamper | The base pad and the fill behind the wall |
| 4 ft level, short torpedo level, rubber mallet | Setting each block level, front to back and side to side |
| Masonry saw or chisel and hammer, eye and ear protection, gloves | Cutting end blocks and caps |
| Caulk gun and the block maker’s cap adhesive | Fixing the caps |
Step 1: Mark the line and dig the trench
Set stakes at each end and pull a string along the face of the wall. Paint the line on the ground. For curves, lay a garden hose in the shape you want and paint along it.
Belgard digs the trench 12 in wider than the block, so a 12 in deep block needs a 24 in wide trench. That matches Allan Block’s typical minimum base of 24 in wide. The depth is the pad (at least 6 in) plus the part of the first block you bury (at least 6 in, step 3).
For a low wall of 6 in blocks, that is about 12 in below the finished grade in front of the wall. Dig the trench bottom flat and firm, and take out soft spots and roots.
Step 2: Build the gravel leveling pad
The pad is what the wall stands on. Belgard calls for a compactable 3/4 in minus base with fines, at least 6 in deep after compaction, extending at least 6 in in front of and behind the first course. Spread it, mist it lightly with water, and compact it.
Then check it with a level and a straight board: it must be level front to back and side to side. Allan Block notes that its base material is usually the same as its wall rock, and that the trench is compacted to the level set in the soil report where there is one.
| What | Belgard (Standard Wall Installation Guide) | Allan Block (Best Practices, ch. 2) |
|---|---|---|
| Trench / base width | 12 in wider than the block; pad ≥ 6 in in front and behind | 24 in, or 12 in wider than the block depth (typical minimum) |
| Base depth | ≥ 6 in after compaction | 6 in (typical minimum) |
| Base material | 3/4 in minus with fines, misted and compacted | Usually the same as the wall rock |
| Buried depth of the first block | ≥ 6 in below finished grade | 1 in per ft of wall height, 6 in typical minimum |
| Drainage zone behind the blocks | 12 in of 3/4 in free-draining aggregate | 12 in wall rock column |
| Drain pipe | 4 or 6 in perforated, as low as possible, outlets every 50 ft | Not on this page (Allan Block’s installation page: over 4 ft, reinforced walls, poor drainage) |
Belgard pp. 8–9; Allan Block Best Practices ch. 2 §2.4–2.8; read 19 Nov 2026. Where they differ, use your own block maker’s guide.
Take your time here. A pad that is a quarter-inch out at the bottom becomes a crooked wall three feet up, and you cannot fix it without taking the wall down.
Step 3: Lay and level the buried first course
Belgard says to bury at least 6 in of the block below finished grade. Allan Block uses 1 in per foot of wall height, with 6 in as the typical minimum. For walls up to 6 ft that works out to 6 in, one course of 6 in blocks. The buried course stops the wall from sliding forward and keeps the pad from washing out.
- Start at the lowest point of the wall, or at a corner or a fixed end.
- Set each block on the pad, tight to its neighbour, with the face on the string line. Some block systems lay the first course differently from the rest (for example with the lip treated another way); follow the maker’s sheet.
- Level every block front to back and side to side, and to the next block. Tap it down with the rubber mallet; add or scrape a little base, never stack shims under it.
- Fill the hollow cores and the gaps between blocks with drainage stone, if your block has them.
Step 4: Drain pipe and filter fabric
Water is the main enemy of a retaining wall, so the drain goes in now, before the wall is in the way. Belgard places a 4 or 6 in perforated drain tile as low as possible behind the wall, bedded in and covered with 3/4 in free-draining rock, with an outlet through the wall face or to daylight every 50 ft along the wall.
Allan Block calls for a drain pipe on gravity walls over 4 ft, on reinforced walls and wherever drainage is poor. On a lower wall it is cheap insurance.
Belgard shows filter fabric as optional. If you use it, lay it against the soil behind the drainage zone and fold it over the top later, so fine soil cannot wash into the stone and clog it.
Step 5: Add courses, backfill and compact as you go
Lay the next course with the joints staggered over the course below, like brickwork. Each block bridges the joint underneath. Then, course by course:
- Fill 12 in behind the blocks with 3/4 in free-draining stone (Belgard; Allan Block calls it a 12 in wall rock column).
- Fill behind the stone with soil and compact it before you add the next course, as Belgard asks.
- Keep heavy machines back. Belgard says no self-propelled compaction equipment within 4 ft of the back of the wall; use a hand tamper or a light plate there.
- Sweep the top of each course clean before the next goes on, so the blocks sit flat.
Cut end blocks to length with a masonry saw, wearing eye and ear protection. Put cut faces where they will not show, and avoid very short pieces at the ends.
Step 6: Geogrid on taller walls, and when you need an engineer
Above the gravity height for your block, the wall needs geogrid: sheets of plastic grid laid between courses and out into the compacted soil, which turn a strip of soil into part of the wall. Belgard recommends geogrid for walls that exceed gravity height limits and says to consult a qualified engineer.
For scale, Allan Block’s design notes use grid layers at no more than 16 in apart and at least 60% of the wall height long, so a 10 ft wall gets grids at least 6 ft long. Those are design figures for an engineer to apply, not a recipe.
Stop and get a design if the wall is above your block maker’s gravity height chart.
Stop if there is a slope, a driveway, a fence or a building near the top of the wall.
Stop for tiered walls, soft or wet ground, or a wall that holds up a path or parking.
Ask your building department about permits before you buy the blocks.
Step 7: Caps and finishing grade
Fix the caps with the adhesive your block maker specifies and stagger the cap joints over the last course. On a curve, cut the caps to keep the joints tight.
Fold the filter fabric over the top of the drainage stone, then finish the top behind the wall with soil that sheds water, sloped away from the wall. In front, rake the soil back to the finished grade so the buried course stays buried, and make sure the pipe outlet has somewhere to go.
Curves, corners and stepping the base on a slope
On a slope, never tilt the blocks to follow the ground. Belgard says to step them up so they stay level, and to step the leveling pad in 6–8 in increments. Start at the lowest point and build up to the next step; each step should be one block height, so the courses line up.
Curves are easiest with tapered blocks. On an outside curve the face line is longer than the back line, so the blocks fan out and their backs close up. On an inside curve the backs would clash, so you trim the back corners or space the blocks.
Each block system has a smallest radius it can turn; check it before you paint the line. Corners use the system’s corner units, turned the other way on each course so the joints never line up.
Worked examples: how much for a 30 ft × 3 ft wall
Example: a 30 ft × 3 ft block wall
The wall: 30 ft long, 3 ft of block above the ground, 6 in high × 16 in long × 12 in deep blocks, 16 in caps, 5% waste.
Blocks: 30 ft = 360 in ÷ 16 = 22.5, so 23 a course. 3 ft = 36 in ÷ 6 = 6 courses above ground, plus 1 buried (6 in, since 1 in per ft × 3 ft is less than the 6 in minimum): 7 courses. 23 × 7 = 161, + 5% = 169.05, so 170 blocks. Caps: 23 + 5% = 25.
Base: 24 in wide × 6 in deep × 30 ft = 2 × 0.5 × 30 = 30 cu ft (1.11 cu yd), at 110 lb/cu ft = 3,300 lb = 1.65 tons.
Drainage stone: 1 ft thick × 3.5 ft built height × 30 ft = 105 cu ft (3.89 cu yd), at 100 lb/cu ft = 5.25 tons.
Pipe and fabric: 30 ft along the wall + one 10 ft outlet = 40 ft of pipe. Fabric for the back and top of the stone: 3.5 × 30 + 1 × 30 = 135 sq ft before laps.
Example: a 20 ft × 2 ft raised bed wall
Same blocks. 240 in ÷ 16 = 15 a course; 24 in ÷ 6 = 4 courses + 1 buried = 5 courses; 75 + 5% = 79 blocks and 16 caps. Base 2 × 0.5 × 20 = 20 cu ft (1.1 tons); drainage stone 1 × 2.5 × 20 = 50 cu ft (2.5 tons); 30 ft of pipe; 70 sq ft of fabric.
These are the calculator’s own numbers. Open the worked example in the retaining wall calculator to change any of them, or see this wall built up step by step in 3D: the designer lays the base, the buried course, the drainage stone and the courses in order, and “Take apart” shows each layer. Stone weights change with the stone; the crushed stone calculator converts cubic yards to tons for other kinds.
Common mistakes
- Skimping on the base. Less than 6 in of compacted pad, or a pad that is not level, is the most common reason a wall leans or bows.
- Not burying the first course. A wall that sits on the surface can slide forward. Bury at least 6 in.
- Backfilling with the soil you dug out. The 12 in zone behind the blocks must be clean, free-draining stone, or water pressure builds behind the wall.
- No way out for the water. A drain pipe with no outlet is a bathtub. Run it to daylight, every 50 ft on a long wall.
- Sloping the blocks on a slope. Step the base instead and keep every course level.
- Going taller without a design. Above the block maker’s gravity height, or with loads above, get an engineered design.
- Compacting with a heavy machine against the wall. Keep self-propelled compactors 4 ft back.
Planning a patio on the new terrace? The paver base calculator works out the gravel and sand under it, and the gravel calculator handles paths and fill.
Sources
Where the numbers on this page come from. Everything else is plain geometry and unit conversion, which the calculator does with exact factors.
- Standard Wall Installation Guide (SRW Quick Reference Install Guide), Belgard, PDF posted October 2023 (no date printed in it), pp. 7–10 (read 19 November 2026). Used for: trench 12 in wider than the block; leveling pad of 3/4 in minus base with fines, at least 6 in deep after compaction and at least 6 in in front of and behind the first course, misted before compaction and level both ways; at least 6 in of the base block buried; on a slope, step the pad 6–8 in at a time and keep blocks level; 12 in of 3/4 in free-draining aggregate behind the wall; 4 or 6 in perforated drain tile as low as possible, outlets every 50 ft; compact the fill before the next course; no self-propelled compactor within 4 ft of the back of the wall; geogrid for walls above the gravity height limit, designed by a qualified engineer; check local codes for height limits
- Best Practices for Segmental Retaining Wall Design, Chapter 2: Typical Retaining Wall Construction, Allan Block, web page, undated (read 19 November 2026). Used for: base 6 in deep by 24 in wide (or 12 in wider than the block depth) as the typical minimum; base material consistent with wall rock; burial of 1 in per ft of wall height; a 12 in wall rock column behind the facing; geogrid at 16 in maximum spacing and at least 60% of the wall height long
- Residential Installation: Basic Installation, Allan Block Corporation, web page © 2025, as cited on the Retaining Wall Calculator (researched 13 November 2026; not re-read for this guide). Used for: a drain pipe on reinforced walls, on gravity walls over 4 ft and where drainage is poor
- Call Before You Dig!, Pipeline and Hazardous Materials Safety Administration (PHMSA), U.S. Department of Transportation, web page, undated (read 19 November 2026). Used for: dial 811 to reach the one-call center wherever you dig; states require a call 48 to 72 hours before digging; the call is free; utilities mark their lines with flags or paint
A guide for low segmental block walls, not a structural design. Your block maker’s installation guide, its height chart and your local building rules come first. Quantities are from the Retaining Wall Calculator’s formula, shown in the worked example.
Frequently asked questions
What is a retaining wall?
A wall that holds soil back where the ground changes level, so you can have a flat terrace, a level patio or a raised bed on a slope. The low walls most homeowners build are segmental (dry-stacked concrete block) gravity walls: they stay up by their own weight, a buried first course and good drainage. Timber, stone and poured concrete walls do the same job.
How deep should the base of a retaining wall be?
Belgard asks for a gravel leveling pad at least 6 in deep after compaction, reaching at least 6 in in front of and behind the first course. Allan Block gives 6 in deep by 24 in wide as the typical minimum. On top of that, part of the first block is buried below the finished grade, so the trench is deeper than the pad.
How much of the first course should be buried?
Belgard says at least 6 in of the block below finished grade. Allan Block uses 1 in per foot of wall height, with 6 in as the typical minimum. For a low wall of 6 in blocks that means one whole course buried. The Retaining Wall Calculator works out the buried courses for your wall height and block.
How tall can I build a retaining wall without an engineer?
It depends on the block and the site. Belgard says gravity walls have height limits specific to each product and to check local building codes; walls above that limit need geogrid and an engineered design. The Retaining Wall Calculator warns above 3 ft by default, the landscape-wall limit in the Pavestone guide it cites. Read your block maker’s chart and your local rules before you build.
Do I need a drain pipe behind a retaining wall?
It is good practice on almost any wall that holds back wet ground. Belgard shows a 4 or 6 in perforated drain tile as low as possible behind the wall, in the drainage stone, with an outlet through the wall face every 50 ft. Allan Block calls for one on gravity walls over 4 ft, on reinforced walls and where drainage is poor.
What gravel goes behind a retaining wall?
Clean, free-draining stone: Belgard specifies 12 in of 3/4 in free-draining aggregate behind the wall, and Allan Block a 12 in wall rock column. The base pad is different: Belgard uses 3/4 in minus with fines, which compacts hard. Filter fabric between the drainage stone and the soil keeps fines from clogging it.
How many blocks do I need for my wall?
Blocks per course = wall length ÷ block face length, rounded up; courses = height above ground ÷ block height, rounded up, plus the buried course. A 30 ft wall 3 ft high in 6 × 16 in blocks is 23 blocks a course × 7 courses = 161, or 170 with 5% waste. The Retaining Wall Calculator does this for any size and adds caps, gravel and pipe.