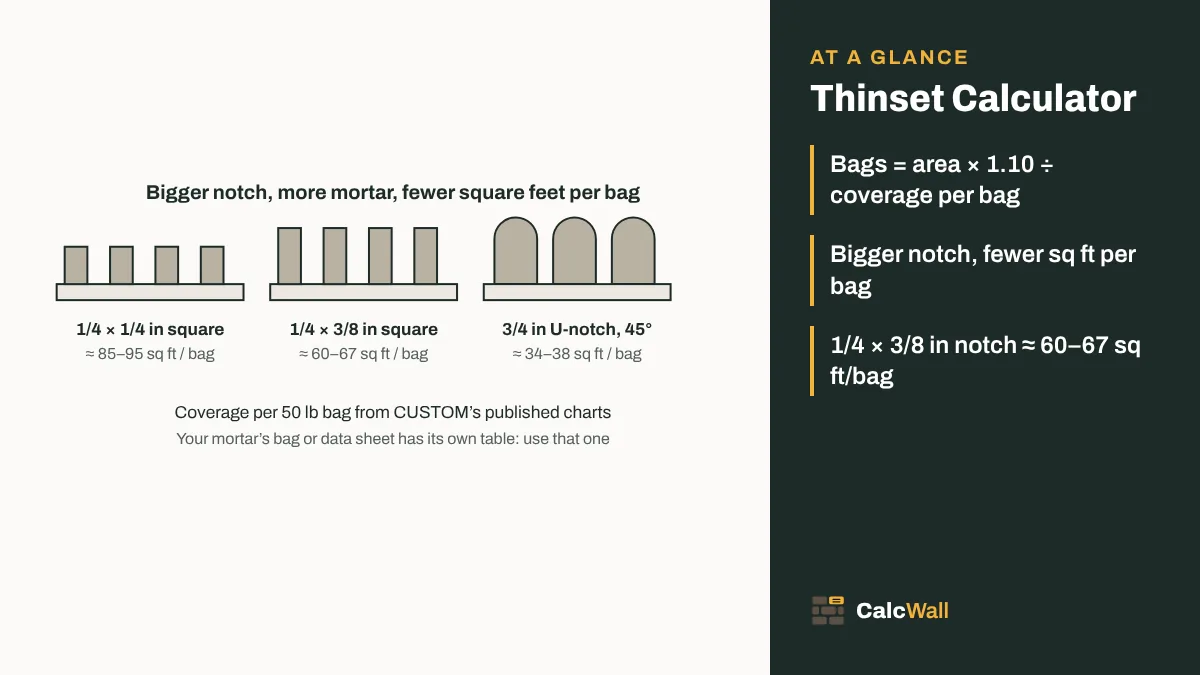
Quick answer: bags = area × 1.10 ÷ coverage per bag, rounded up. A 12 × 10 ft floor with a bag that covers 90 sq ft needs 2 bags.
How to calculate
- Measure the length and width of each area to tile.
- Subtract anything not tiled, such as an island.
- Add about 10% extra.
- Divide by the coverage per bag for your trowel notch (on the bag) and round up.
Bags = (area − not tiled) × 1.10 ÷ coverage per bag, rounded up
The figure that matters most is the coverage per bag, and it is not one number. The same 50 lb bag can cover 90 sq ft or 35 sq ft depending on the trowel, because the notch decides how thick the bed is. That is why the calculator asks for it instead of guessing.
Metric example: a 4 × 3 m floor is 12 m², plus 10% = 13.2 m². With a bag that covers 5 m² that is 2.64, so 3 bags.
Coverage per bag depends on the mortar, the trowel notch and the flatness of the floor. Always use the manufacturer’s figure; the defaults here are examples, not a recommendation. Thinset is a tile mortar; for laying brick or block, use the masonry mortar calculator.
Coverage by trowel notch
Mortar makers print a coverage table on the bag or the technical data sheet. Find the row for your notch and use the lower number if the floor is not dead flat. As an example, here are the tables CUSTOM publishes for two of its mortars, per 50 lb bag.
| Trowel notch | CustomBlend (TDS-191) | VersaBond-LHT (TDS-132) |
|---|---|---|
| 1/4 × 1/4 in square | 85–95 sq ft | 90–100 sq ft |
| 1/4 × 3/8 in square | 60–67 sq ft | 60–67 sq ft |
| 1/2 × 1/2 in square | not listed | 42–47 sq ft |
| 3/4 in U-notch, held at 30° | not listed | 42–47 sq ft |
| 3/4 in U-notch, held at 45° | not listed | 34–38 sq ft |
Two things stand out. First, going from a 1/4 × 1/4 to a 1/4 × 3/8 notch cuts the coverage by about a third. Second, the angle you hold a big U-notch trowel at changes how much mortar it leaves: the 45° row covers about 20% less than the 30° row with the same trowel. CUSTOM also notes that it does not recommend the 1/2 × 1/2 in square notch, because the wide spacing between notches makes it harder to get the tile fully bedded.
Bags of thinset by area
This chart adds 10% to the area and rounds up to whole bags, the same as the calculator, for three coverage rates that span the table above.
| Area to tile | At 90 sq ft / bag | At 60 sq ft / bag | At 42 sq ft / bag |
|---|---|---|---|
| 25 sq ft | 1 | 1 | 1 |
| 50 sq ft | 1 | 1 | 2 |
| 100 sq ft | 2 | 2 | 3 |
| 150 sq ft | 2 | 3 | 4 |
| 200 sq ft | 3 | 4 | 6 |
| 300 sq ft | 4 | 6 | 8 |
| 500 sq ft | 7 | 10 | 14 |
On a 500 sq ft floor the trowel alone is the difference between 7 bags and 14. Pick the tile and the trowel before you order mortar, and get the tile count from the tile calculator using the same area.
Getting full mortar coverage
The ridges you comb with the trowel are not the finished bed. When the tile is pressed in and moved slightly across the ridges, they should collapse into a solid layer with no hollow channels underneath. If they don’t, the tile is sitting on stripes of mortar with air between them, which is how corners crack and tiles come loose.
The only way to know is to look. Set a tile, pull it back up and check the back. If you see bare stripes or bare corners, go up a notch size, comb the ridges in one direction, or back-trowel. Each of those uses more mortar, so if your test tiles tell you to change the trowel, rerun the calculator with the new coverage figure.
Back-troweling large tile
Large-format tiles, tiles with deep patterns on the back and ungauged stone often need mortar on the tile as well as on the floor. CUSTOM describes two ways: a flat coat skimmed onto the back (flat back-troweling, which used to be called back-buttering) or a notched coat on the back as well.
The bag tables are for the floor bed only. A flat skim coat is thin, but over a large floor it adds up, and a notched coat on the back uses more again. CUSTOM’s advice is to allow for the pattern and depth of the tile back when you estimate. The calculator has no back-troweling switch, so raise the waste figure instead: 15–20% for a flat skim coat is a reasonable start. Lift a few tiles in the first row to check, and adjust.
Floors, walls and showers
Wall tile is usually smaller and lighter, so a smaller notch often does the job and a bag goes further. Work out the wall area with the wall square footage calculator (subtracting the tub, the window and anything else not tiled) and enter it as its own row with the wall notch coverage.
Showers and outdoor floors are where the 95% rule applies, so expect to use more mortar per square foot than the same tile in a dry hallway. If you are tiling a shower floor over a mortar bed or a foam tray, the thinset is only for the tile; the bed or tray is a separate material.
In square meters, the CUSTOM tables give 5.6–6.2 m² per bag with a 6 × 9.5 mm square notch and 3.2–3.5 m² with a 19 mm U-notch at 45°. Set the calculator to meters and enter the metric figure from your bag.
Worked examples
Two jobs, small and large, worked the same way as the calculator.
Bathroom floor. A 5 × 8 ft bathroom is 40 sq ft. With 12 in tile and a 1/4 × 3/8 in notch at 60 sq ft per bag: 40 × 1.10 = 44 sq ft, and 44 ÷ 60 = 0.73, so 1 bag, with a good part of it left for the wall base or a threshold.
Kitchen with large tile. A 15 × 12 ft kitchen is 180 sq ft; take off a 3 × 6 ft island and you tile 162 sq ft. With 24 in tile, a 3/4 in U-notch at 30° (42 sq ft per bag) and 20% extra for back-troweling: 162 × 1.20 = 194.4 sq ft, and 194.4 ÷ 42 = 4.63, so 5 bags. At 10% extra it would be 4.24, still 5 bags, so the back coat costs nothing extra here.
Round up to the whole bag every time. A half bag left over is cheaper than running out with mortar setting on the floor and half a row still to lay.
Common mistakes
- Using the best-case coverage. The top of the label range assumes a flat floor and perfect technique. Use the low figure.
- Changing the trowel and not the order. If test tiles show you need a bigger notch, the bag count goes up with it.
- Forgetting the walls. A backsplash or a tub surround uses the same mortar. Add those areas as extra rows.
- Counting the island. Cabinets and islands are not tiled under. Take them off as areas not tiled.
- Mixing grout and thinset. They are different products. Thinset goes under the tile; grout goes between.
Notes for tile setters
Pull a tile. Check the first few tiles and then every so often. Bare stripes mean change something before the whole floor is down.
One direction. Combing the ridges in straight lines, not swirls, lets air escape when you push the tile across them.
Flat floor first. A dip you fill with thinset eats bags fast. Fix big dips with a patch or leveler before tiling.
Same lot. Buy every bag for the job at once, in the same product, so you are not mixing two mortars on one floor.
Sources
Where the numbers on this page come from. Everything else is plain geometry and unit conversion, which the calculator does with exact factors.
- VersaBond®-LHT Professional Large and Heavy Tile Mortar (TDS-132), Custom Building Products. Used for: coverage per 50 lb bag by trowel notch (1/4 × 1/4 to 3/4 in U-notch at 30° and 45°), the 80% / 95% mortar coverage rule and back-troweling large tile
- CustomBlend® Economical Non-Modified Thin-Set Mortar (TDS-191), Custom Building Products. Used for: a second coverage table (85–95 sq ft and 60–67 sq ft per 50 lb bag) and the guidance that large tiles may need a bigger notch or back-troweling
- NIST Handbook 44, Appendix C: General Tables of Units of Measurement, National Institute of Standards and Technology, 2026 edition. Used for: 1 sq ft = 0.09290304 m² for the metric figures
Frequently asked questions
How much thinset do I need?
Divide the area to tile, plus about 10% extra, by the coverage per bag printed on the label for the trowel you use. For a 12 × 10 ft floor (132 sq ft with 10% extra) and a bag that covers 90 sq ft, that is 1.47, so 2 bags.
How much does a bag of thinset cover?
It depends on the product and the trowel notch: the bigger the notch, the less a bag covers. CUSTOM lists 60–67 sq ft per 50 lb bag with a 1/4 × 3/8 in square notch for both products checked here. Use the figure for your own mortar; the calculator does not assume one.
Which trowel size should I use?
Larger tiles need a larger notch to get full contact. Follow the tile and mortar manufacturers’ recommendations for your tile size and substrate, and lift a tile to check the coverage.
Should I back-butter large tiles?
Many installers back-butter (back-trowel) large-format tiles, which uses extra mortar. Add more waste (15–20%) if you plan to.
Does this include grout?
No. Thinset bonds the tile to the floor or wall; grout fills the joints between tiles and is bought separately.
How many bags of thinset for 100 sq ft?
With 10% extra, 100 sq ft becomes 110 sq ft. At 90 sq ft per bag that is 2 bags, at 60 sq ft per bag also 2, and at 42 sq ft per bag 3.
How much tile does one bag of thinset cover in square meters?
The CUSTOM tables give 5.6–6.2 m² per 50 lb bag with a 6 × 9.5 mm square notch and 3.2–3.5 m² with a 19 mm U-notch held at 45°. Enter your bag’s metric figure with the calculator set to meters.
Can I use the same thinset on walls and floors?
Many mortars are rated for both, but wall tile is often set with a smaller notch, so a bag goes further on a wall. Measure walls with the wall square footage method and use the label coverage for the notch you will use there.
Is this thinset calculator free to use online?
Yes. The CalcWall Thinset Calculator is completely free and works online in any browser, on a phone, tablet or computer. There is nothing to download and no account to create, and the math runs right in your browser, so results appear as you type.